Choosing the best digital signal processor for a car audio system requires balancing features and design choices with your amplifier and speaker configuration. The product development team at ARC Audio knows more than a thing or two about designing and calibrating DSP units, as their products have consistently proven to be a vital part of the best-sounding car audio systems on the planet. Their popular PSM DSP has been updated significantly to create the new PSM PRO. It’s laden with new features, making it an excellent choice for car, powersports, marine or motorcycle audio applications. Let’s check it out!
Physical Features of the ARC Audio PSM PRO
The original PSM DSP had six inputs and six outputs and was housed in a compact case that was easy to hide in the dash of a car or truck or in a motorcycle’s fairing. As a result, many people considered the PSM a powersports-only application. In reality, it was an excellent choice for any mobile audio application that only needed six output channels. The new PSM PRO is built on the same hardware platform as the DSP in the PS8-Pro and the impressive Blackbird DSP-equipped amplifier, which was a recent subject of a detailed Test Drive Review. While the PSM PRO unit retains the six inputs, it now offers eight outputs, a coaxial digital input, support for the Maestro AR integration module platform and a host of advanced processing and configuration features.
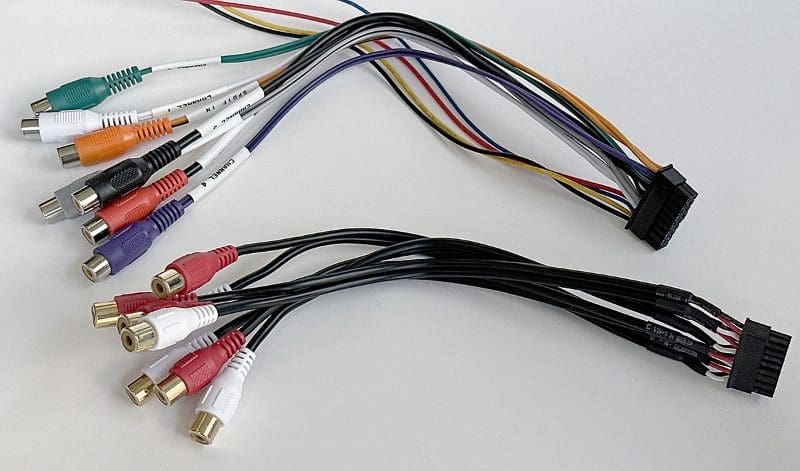
The PSM PRO is built on an injection-molded plastic case that’s 3.75 inches wide, 3 inches deep and 1.35 inches tall. The six input and eight output RCA connections are on pigtails that use compact Molex connectors. The left connector also includes the main power connections, the remote turn-on input, the remote turn-on output and an RCA jack for the coaxial digital input. All the input RCA connections have white heat-shrink labels that denote which connection is which. The output connections are paired, with the leftmost on the connector being channel 1.
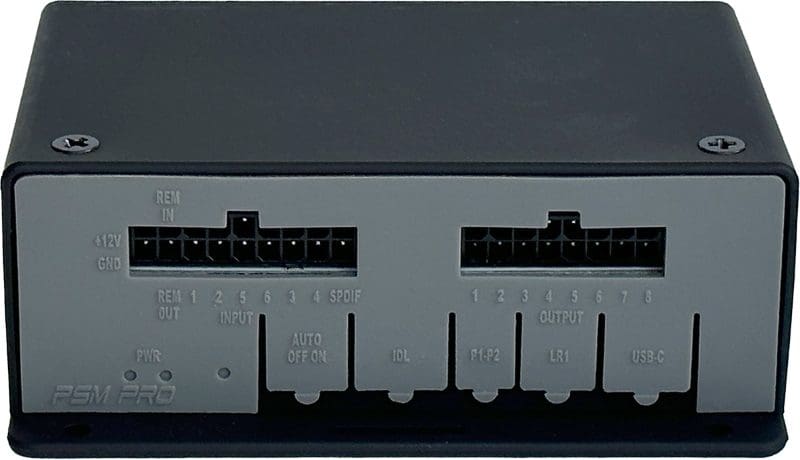
There’s a second row of connections and controls lower on the chassis. A switch on the far left activates the automatic turn-on circuit. When activated, inputs 1 and 2 are monitored for BTL voltages common to the amplifier in head units. The subsequent three connections use JST-XH connectors. The first is a four-pin plug for connection to an optional iDatalink Maestro AR interface. The next two-pin plug is for the preset selection connections. The third is a three-pin plug for an optional LR1 remote level control. The last connection is a USB-C jack that connects to a Windows computer for system configuration and calibration. The connections have fold-up rubber covers to help keep water out of the processor should it be installed in a fairing or an ATV. It’s not waterproof, but these covers help keep things dry.
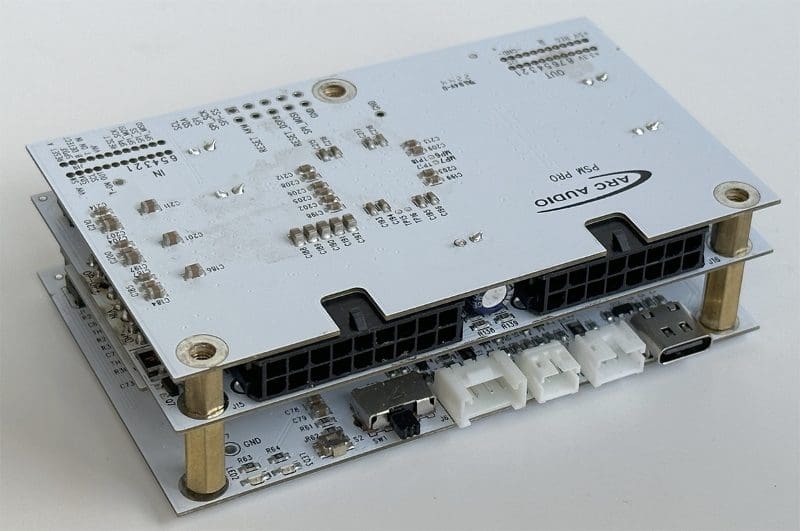
Inside the case are three high-quality, two-sided circuit boards. The three boards are stacked vertically and held together with brass spacers. Signal and power connections between the boards are handled by two sets of tall through-hole headers that extend up from the bottom board. The PSM PRO’s heart is an ATMEL SAMD21 32-bit ARM Cortex microcontroller and an Analog Devices ADAU1452 32-bit SigmaDSP digital audio processor.
You’ll note that many car audio brands make grandiose claims about how quickly the processor in their DSP runs and the number of MIPS it has. What matters much more is the circuit design around the analog-to-digital converters (ADC) and digital-to-analog converters (ADC), which significantly affects the unit’s sound quality. Speaking of ADCs and DACs, the PSM PRO uses three stereo 24-bit ADCs running at 96 kHz and four 24-bit 192-kHz DACs on the output side. The inputs use TL072 low-noise JFET op-amps for the differential circuitry and voltage divider network. The outputs are all buffered by stereo pairs of the same Texas Instruments TL072 devices. A fourth circuit board floating just above the back of the Analog I/O board is home to the power supplies for the device. Aside from some electrolytic filter capacitors and the stand-offs that connect the boards, all the components are surface-mount, including some incredibly fine 0.5-mm pitch QFN24 package devices. I purchased a 10x magnifying loupe to read some of the part numbers. Perhaps my eyes are finally getting old?
Speaking of the power supply, the ARC Audio PSM PRO is compatible with vehicles with a stop/start feature. In addition, the unit can function reliably down to voltages as low as 6 volts continuously and won’t crash with momentary dips to 4.5 volts.
ARC Audio ARC DNA Software
ARC Audio has been hard at work on a universal configuration and calibration software platform called ARC DNA. The new software suite works with the PSM PRO, the Blackbird and new units that are in the pipeline. The setup and adjustment menus are all self-configured, based on the processor detected by the software. So, for example, your audio system could include a Blackbird and a PSM PRO, and the software would switch automatically between 12 outputs and eight outputs, depending on which you selected from the Device menu.
The layout of the software is configured by feature rather than by channel. Unlike software that crams all the settings in one window, this layout lets your installer focus on one configuration process at a time. The design makes sense, since they’ll only set things like the mixer and crossovers once.
The ARC DNA software includes four sets of level indicators at the bottom of the screen. The indicators illuminate green when a signal is detected, then switch to orange and finally red if the signal approaches a voltage or digital processing limit. Clicking on the Tools menu gives access to the Meters bar. This bar replicates the information on the level indicators. I can’t fathom trying to configure a signal processor without knowing the level of each channel after the input mixer and equalizer. Many DSP units behave poorly if you clip a signal in the digital domain.

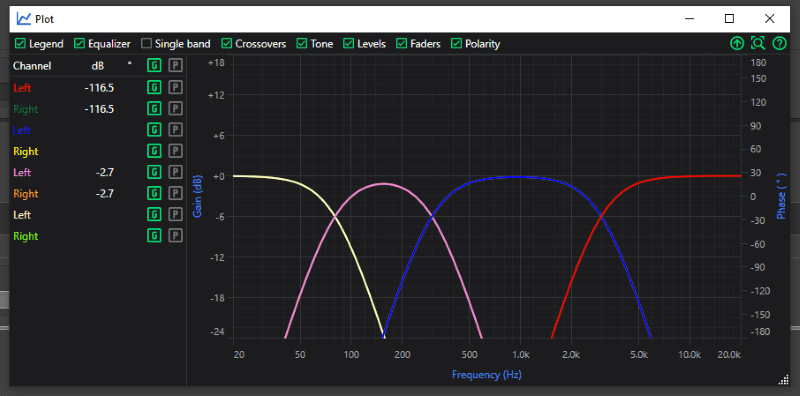
ARC DNA improves the response graph feature to show the effect of crossovers, equalization and level controls on the outputs. In addition, the technician can toggle specific functions on and off by checking or unchecking the options across the top menu.
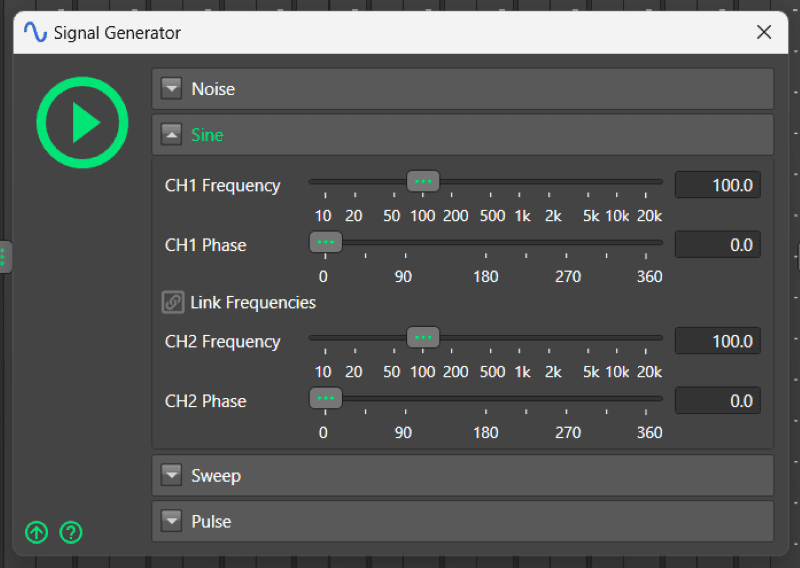
The DNA software has been enhanced with an input gain wizard to speed up the initial configuration process. In addition, a built-in signal generator can also create full-bandwidth or frequency-filtered pink noise, sine waves, sine sweeps or pulses. This feature can replace test tone tracks to speed up the calibration process if the technician desires.
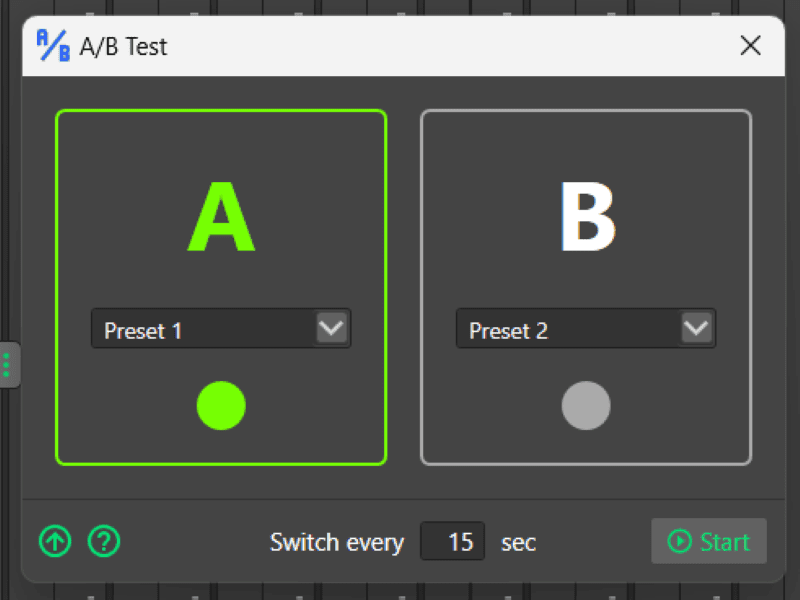
ARC Audio has added a feature called A/B Test. It switches between any presets to let the client decide their preferred settings. The feature automatically switches between the selected presets at user-defined intervals. After all, delivering a system the client enjoys is the key to making them happy.
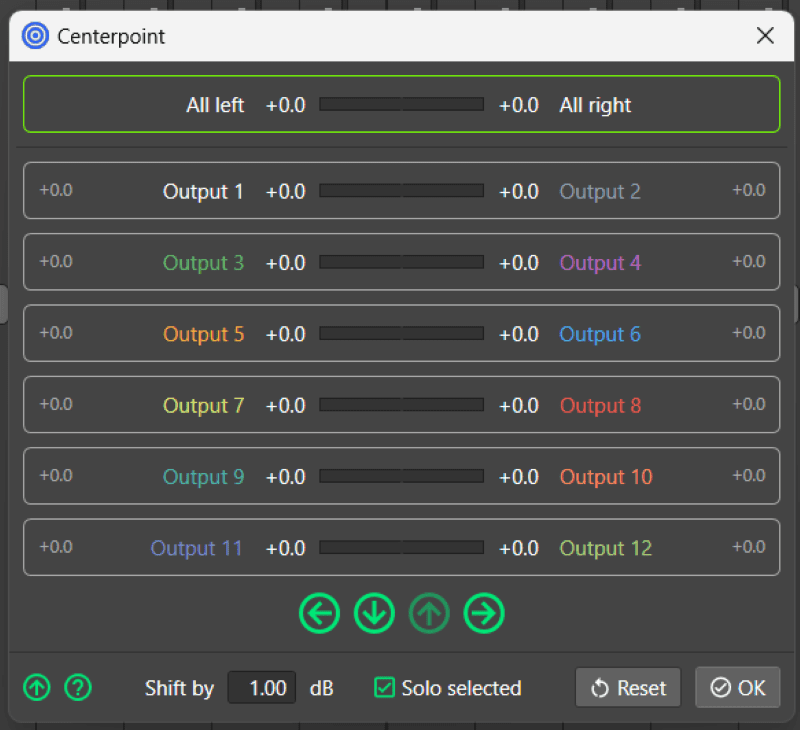
Another new feature is called Centerpoint. This tool would be considered an elaborate balance adjustment, except it can be used on pairs of outputs. Your technician can use Centerpoint with pulse tracks to ensure that the output of your tweeters, mids, woofers or rear-fill speakers is equal in amplitude at the listening position. It doesn’t affect overall balance as moving the slider to the left increases the output on the left by 0.5 dB and decreases the right by the same amount. Keyboard arrow keys are configured to make using Centerpoint quick and intuitive.
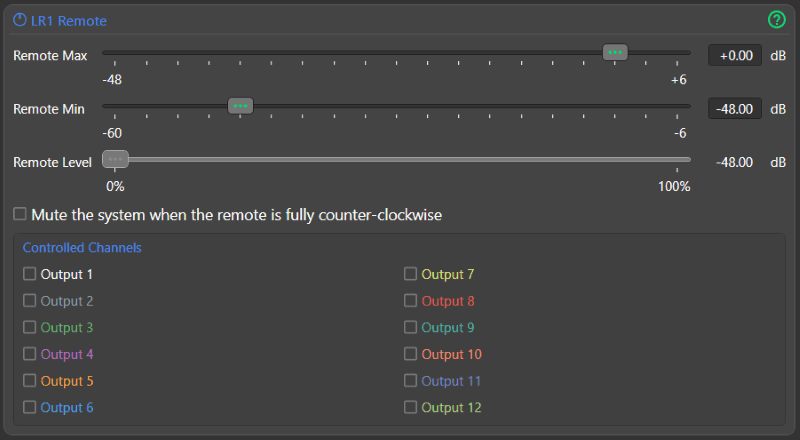
The Remote tab lets your installer configure which channels the optional LR1 remote level control affects. This feature allows the remote to function as a subwoofer level control, a master volume control or even a rear-fill or center-channel control.
Finally, the software includes the option to import EQ filter files directly from Room EQ Wizard. If your installer wants to make measurements and use the EQ configuration function in REW to create EQ band adjustments, importing the results dramatically shortens the configuration process. In addition, the import feature lets the technician decide which EQ band the data is loaded into. It’s like having an auto-EQ function with complete control over what’s being measured and the target response curve.
The PSM PRO has two wires that can be used to select from one of the four system configuration presets. For example, with neither wire grounded, preset 1 would be loaded. Grounding only wire 1 loads preset 2. Grounding only wire 2 loads preset 3. Grounding both wires loads preset 4. The PSM PRO switches presets quickly, so having a calibration for critical listening, driving around town, or blasting your favorite tunes is easily accessible. You could also have a calibration that uses all-pass filters to optimize the system for driver and passenger seating positions.
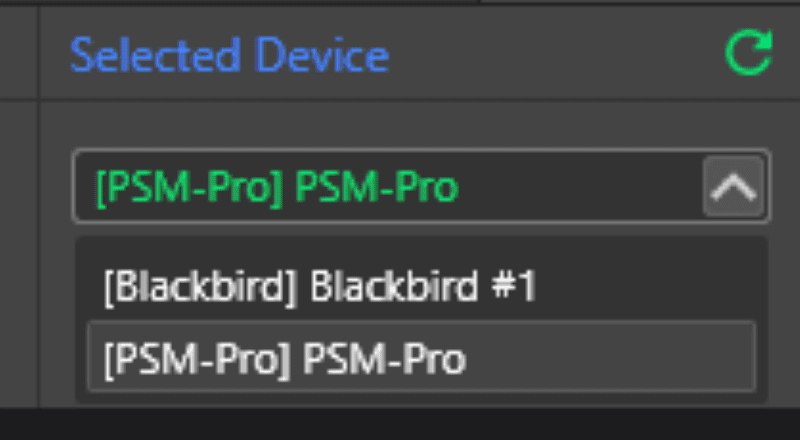
ARC Audio includes a feature in the ARC DNA software that allows your technician to name a processor connected to the computer, then plug in another and give it a different name. These can all be accessed for easy configuration without connecting or disconnecting cables. The technician can switch between devices from a simple pull-down menu. If your application requires 16 output channels, a pair of PSM PRO processors can do what you need.
Signal Processing Configuration and Calibration Features
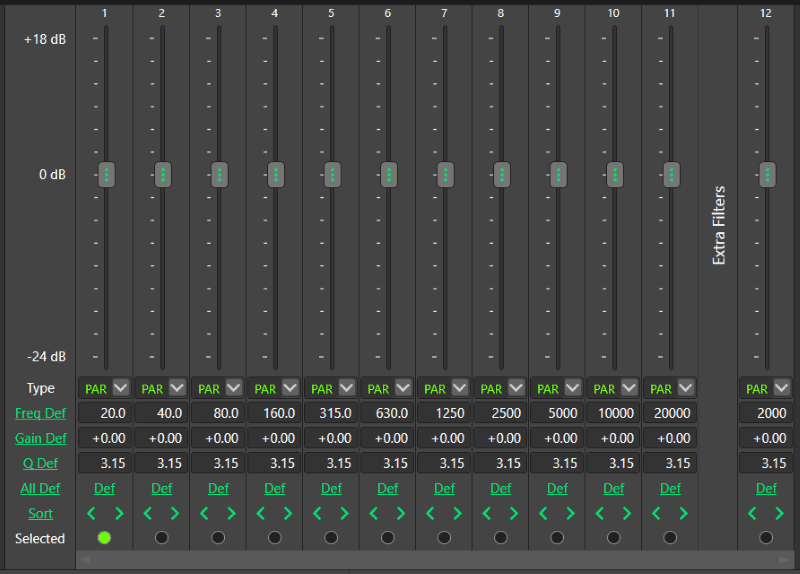
ARC Audio knows that dealing with factory signal processing is vital to creating great-sounding audio systems when using the OE head unit. As such, each of the six inputs on the PSM PRO includes 12 bands of parametric equalization, shelf filtering or first- or second-order all-pass filters. Each channel also has delay settings that can add up to 11.04 milliseconds to each channel. When combined with an audio measurement system that can measure phase, these are all the tools a technician would need to flatten and time-correct a signal from almost any factory-installed audio system in just a few minutes.
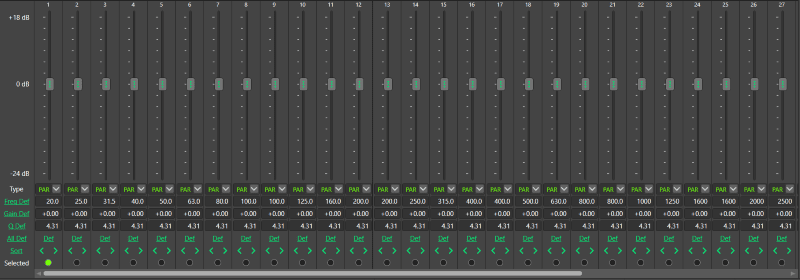
The output equalization screen is complex at first glance but quickly reveals its elegant design. When in Normal mode, there are 31 bands of graphic equalization. Six more processing bands are added if your installer clicks the Advanced radio button in the top right. In Advanced mode, each band now offers fully parametric EQ setting options and first- or second-order all-pass filtering or shelf filters. A feature I haven’t seen before allows the technician to move a band up or down the page. For example, let’s say they wanted to add some equalization at 2,250 hertz. They could configure channel 32, make their settings, then use the left arrow to place that band between the 2 and 2.5 kHz bands. The technician can also click Sort on the far left, and the processor will put the EQ bands in ascending frequency order.
Another essential feature of the EQ panel is that the keyboard arrow keys are configured to move from band to band with the left and right keys and increase and decrease the output level with the up and down. This makes it easy to navigate without having to use a mouse. Unfortunately, not every software solution offers this, and it’s a huge time-saver.
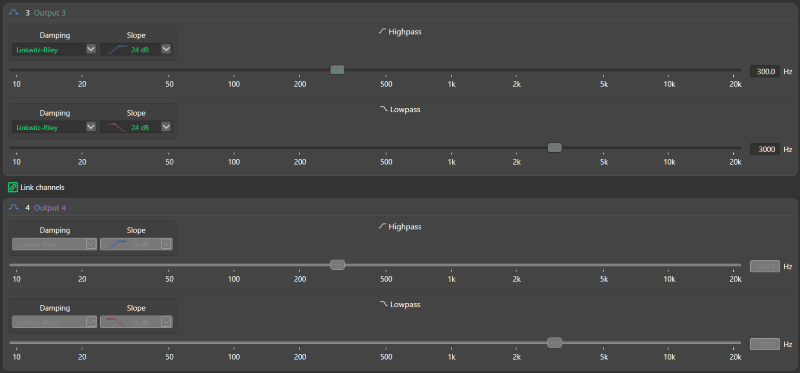
Each output channel has its own adjustable crossover that can be set in low-, high- or bandpass modes with your technician’s choice of Butterworth, Linkwitz-Riley, Bessel, Chebyshev or Variable Q alignments. Attenuation slopes are adjustable from -6 to -48 dB/Octave. Crossover frequencies are adjustable from 10 Hz to 20 kHz in 0.1-hertz steps.
It’s important to highlight that the crossover adjustments are available to any channel and that the input mixer can route signals from any input to any output. If your installer wants to use channels 1, 2 and 3 for the left tweeter, midrange and woofer, then channels 4, 5 and 6 for the right channels, the PSM PRO can do that. Channel 7 could feed a center channel, and channel 8 could feed a subwoofer. Signal routing and processing aren’t fixed in channel pairs anywhere in the device or software. Not all processors are this flexible. With that said, if your technician wants to use channels 1 and 2 for tweeters, for example, there is an option to link the crossover settings for channel pairs to save time.
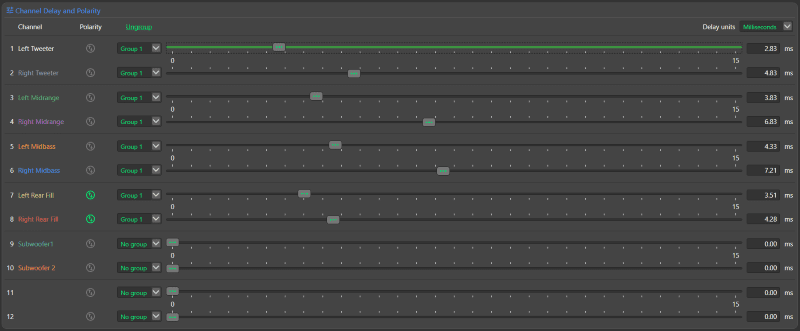
Finally, each output has delay settings that can be adjusted in 0.01-millisecond steps up to a maximum of 15 milliseconds. In addition, the adjustment panel has grouping options that make it easy for your technician to adjust multiple channels at once. This grouping feature is a key benefit of dividing the software interface by function rather than channels.
The delay and polarity screen is similar but allows grouping outputs so they all move together. A little icon beside the channel names illuminates green when the channel polarity is reversed.
iDatalink Maestro Compatibility
It’s worth talking about the iDatalink Maestro compatibility for a moment. ARC Audio has done some impressive work with iDatalink to bring features like Multi-AR control to market. This processor shines when used with an AR interface in a vehicle that uses a fixed-level signal between the radio and the factory-installed amplifier. Most audio upgrades in these applications must be done after the amplifier. The PSM PRO can do that as the RCA input jacks will accept up to 16 volts of signal. The presence of this option confirms that the inputs include balanced circuitry.
The functions of the factory radio tone controls can also be remapped to dedicated bass, midrange and treble adjustments. We have an entire article that looks at the ARC Audio digital signal processors when used with the Maestro AR interfaces.
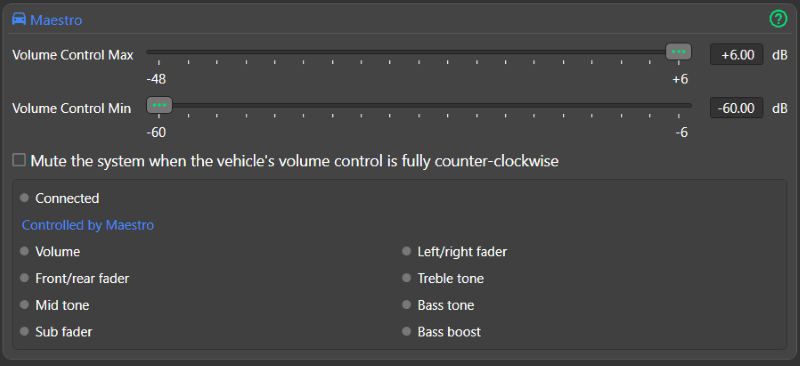
Another Maestro-related feature that shouldn’t be overlooked is its ability to let the technician adjust how the volume control on the factory radio functions. The software allows them to adjust the upper and lower limits so the radio isn’t blaring at low volumes or clipping when cranked. Each volume step is remapped for smooth, linear operation.
With a Maestro AR programmed and connected to the PSM PRO, the fixed audio signal from the factory-installed source unit can be fed into the processor. Then, the AR can translate the CAN Bus commands from the factory radio so that PSM PRO functions like the factory-installed amplifier but with amazing system configuration and calibration options. If you have a vehicle supported by Maestro and want to upgrade the speakers and add subwoofers, a processor with the AR interface is the best choice.
Bench Testing the ARC Audio PSM PRO DSP
Well, that was a mouthful of information, wasn’t it? It’s time to fire up the PSM PRO in the lab. After downloading the ARC DNA software to the lab PC, I connected the processor to my QuantAsylum QA403 audio analyzer to perform some testing. The first test was to measure the maximum output voltage. ARC Audio rates the PSM PRO as being capable of producing 3.5 volts. I measured 3.401 volts before clipping occurred. Given that most amplifiers can accept 4 volts of input, this level works acceptably.
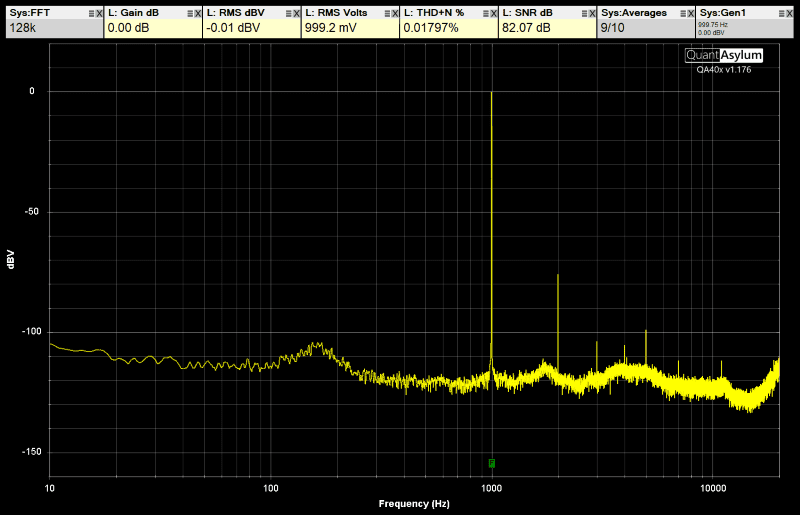
Next, I measured the processor signal-to-noise ratio and distortion at two levels. In reference to the maximum output of 3.4 volts, the PSM PRO delivered an impressive 0.00439% THD+N with a signal-to-noise ratio of 93.27 dB. Dropping the output to 1 volt, the distortion increased slightly to 0.01797%, and the SNR was 82.07 dB. All the numbers are very good for what would be considered an entry-level-priced processor.
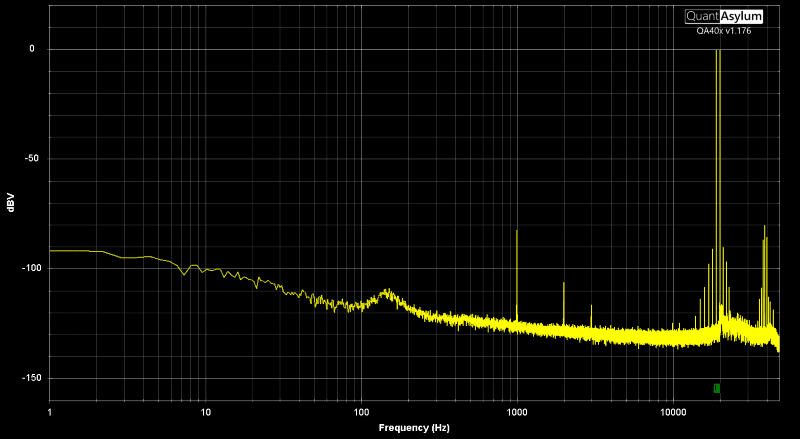
I followed the harmonic distortion test by simultaneously playing 19- and 20-kHz test tones to evaluate intermodulation distortion. The PSM PRO produced a 1-kHz product at -82.58 dB below the test signal. This measurement equates to 0.00742%. The lower side-band at 18 kHz was at -90.97 dB, which is 0.00282%. Both numbers are very good.
The next test was to confirm the function of the equalizers. I made a series of seven measurements with one band of equalization set to +10 dB and -10 dB of boost with Q-factors of 10, 3 and 1 to ensure that the amplitudes and frequency centers overlapped correctly. Some equalizers have problems reaching their programmed amplitude at high Q values. The PSM PRO nailed every measurement with perfect precision.
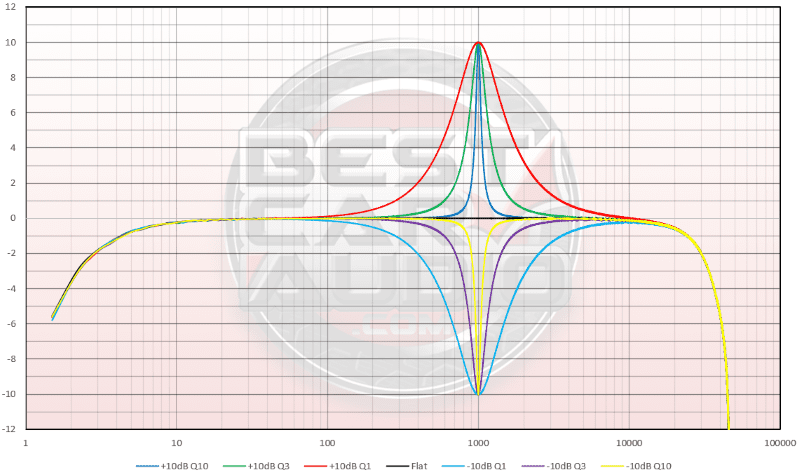
I extracted the -3 dB frequency response limits from the flat response measurement. The PSM PRO was at -3 dB on the bottom end at 2.2 hertz and on the top end at 33.725 kHz. The latter is well beyond the limits of human hearing.
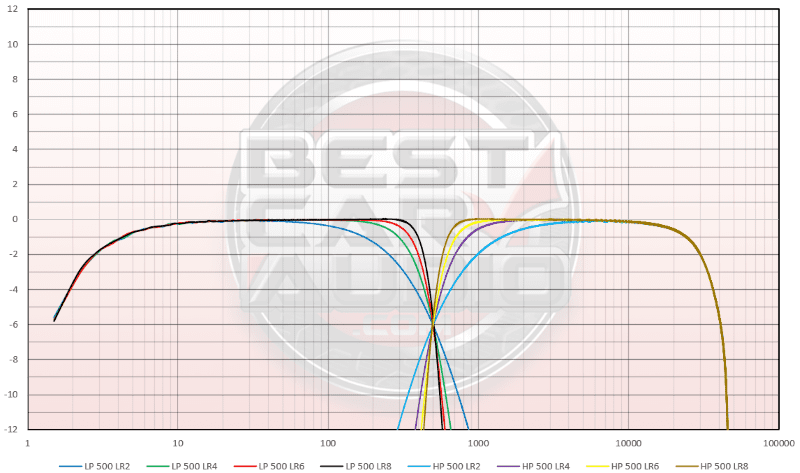
The next test was to quantify the accuracy of the electronic crossovers. I set the crossover frequency to 500 hertz with a Linkwitz-Riley response, then adjusted the slopes to 12, 24, 36 and 48 dB in high- and low-pass modes to ensure that everything always lined up with the 500-hertz -6 dB point. Once again, the processor behaved flawlessly.
The last step was to set the PSM PRO up in my reference system for a listen. The key here was to quantify the perceived system performance differences without any adjustments. Processors that are well-designed won’t have much impact on the clarity of the system. I’ve heard several over the years that give the sound system a muddiness in the midbass and midrange. I installed the ARC Audio PSM PRO between my modified Clarion DRZ9255 head unit and the ARC Audio SE2300 amplifier that powers my reference speakers. I had previously set the output level to make the gain 1:1, so differences in volume wouldn’t taint my comparison.
So, how do I quantify the listening experience difference with the PSM PRO in the signal chain and without it? The best analogy I can think of would be a similar comparison of a high-end head unit to an audiophile-grade solution. It’s not as big a difference as going from a good to a great amplifier, but there is an audible change in clarity. With that said, it’s VERY subtle. The flip side is that the frequency response improvements afforded by having a calibration solution in the system will be worth the time and financial investment. High-end gear is great for improving clarity, but without proper system configuration and calibration, you still don’t get a lifelike listening experience. Finally, I’d consider the “sound quality” of the PSM PRO to be excellent.
Conclusions on the ARC Audio PSM PRO Digital Signal Processor
The adage of stuffing 10 pounds of something into a 5-pound bag couldn’t be more accurate for the PSM PRO. With that said, in the case of this digital signal processor, the items being stuffed are chunks of gold. The PSM PRO’s features and performance are astounding, especially given its compact size. There are no adjustments a technician could need to optimize your audio system that aren’t included in this unit. Further, the inclusion of Maestro AR support highlights ARC Audio’s dedication to supporting modern vehicle integration. Unless you have no other choice, connecting a signal processor to the outputs of a factory amplifier is well worth avoiding.
If you’re shopping for a full-featured digital signal processor to upgrade your car audio system, visit a local authorized ARC Audio retailer and ask about the new PSM PRO. We know you’ll be impressed by its performance, and the price is very reasonable for a unit with its features. To learn more about ARC Audio’s line of premium digital signal processors or their amazing amplifiers, speakers and subwoofers, visit their website, drop into a local authorized retailer or check them out on Facebook, Instagram or YouTube.

