Our Car Audio Masterclass series offers a comprehensive introduction to the essential concepts of car audio systems, covering everything from basic terminology to advanced measurement techniques. To learn more, check out the other articles in the series:
- Car Audio Masterclass 101.2 – Understanding Basic Electricity: Explore voltage, current, and resistance.
- Car Audio Masterclass 101.3 – Electric Circuits: Understand series and parallel circuits.
- Car Audio Masterclass 101.4 – Magnetism: Discover the role of magnetism in speakers.
- Car Audio Masterclass 101.5 – Direct and Alternating Current: Compare DC and AC currents.
- Car Audio Masterclass 101.6 – AC Calculations: Dive into AC waveform calculations.
- Car Audio Masterclass 101.7 – The Decibel: Learn about decibel measurements.
- Car Audio Masterclass 101.8 – Speakers, Power, and SPL: Understand speaker power and sound levels.
- Car Audio Masterclass 101.9 – Time and Frequency Domain Measurement: Explore frequency and time measurements.
- Car Audio Masterclass 101.10 – Digital Multimeter: Learn to use a multimeter in car audio.
Can you fathom the amount of information needed to understand everything about car audio upgrades? You must understand physics, electronics and acoustics while balancing performance goals and cost. It’s no easy feat by any means. The team here at BestCarAudio.com is launching the ultimate guide to everything you might want to know about upgrading the sound system in your car, truck or SUV – Car Audio Masterclass. Much of the information will carry over to motorcycle, powersports and marine applications, but we’ll get into those topics in detail. Let’s establish a solid understanding by explaining some fundamentals of audio terminology.
What Is Sound?
At the most fundamental level, sound refers to vibrations or pressure waves that travel from the source to our ears. The cochlea is a small snail-shaped organ in the human inner ear filled with a fluid that is excited by air vibrations. There are 25,000 nerve endings in the cochlea. These nerves translate the liquid’s movement into minute electrical impulses that travel to our brain.
Sound-Related Terminology – Frequency and Wavelength
To communicate intelligently about sound, we need understand proper audio terminology. You wouldn’t walk in Starbucks and ask for a large triple-triple, right? The first term we should understand is frequency. The term frequency describes the number of oscillations per second. For example, 500 oscillations per second would describe a sound with a frequency of 500 hertz. The unit hertz is the SI standard for frequency and represents the number of oscillations per second. The abbreviation is Hz. Since we often talk about frequencies above 1,000 Hz, we use the abbreviation kHz. For example, 2 kHz is the same as 2,000 Hz.
To clarify this vibration concept, we should consider that, in actuality, sound pressurizes and rarefies the air, basically pushing and pulling on our ears at near-microscopic levels. The speed at which these tiny pressure waves arrive defines the frequency of the audio information.
It’s also crucial to understand that almost all the sounds we hear are made up of multiple frequencies rather than just one. This gives everyone a distinctive voice and different instruments a unique sound. Our brains analyze and process this frequency information, then compare it with our database of experiences to describe what the sound represents. It might be the sound of a baby crying, a siren from a police car or the strum of a pick on guitar strings.
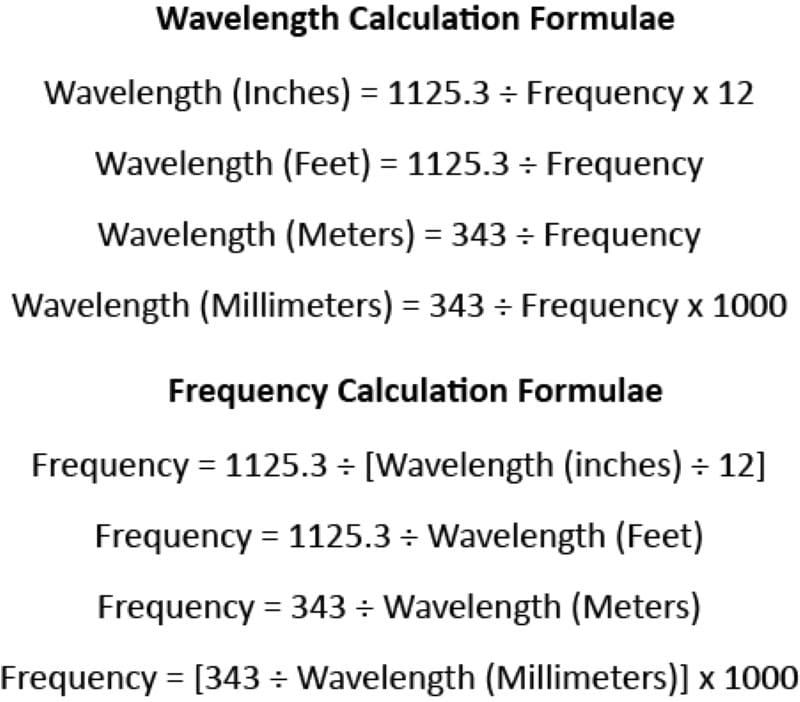
An important term related to the discussion of frequency is wavelength. The term wavelength describes the actual length of the pressure oscillation, from where it starts to where it begins to repeat. If we know the wavelength, often supplied in inches or millimeters, we can calculate the frequency and vice versa. For example, a frequency of 500 Hz has a wavelength of 686 millimeters or 27.01 inches. If we measure a distance of 10 inches (400 millimeters) between a sound source and an object, we know to look for anomalies that are octave multiples of 1,350 Hz.
Sound Amplitude
The second piece of audio terminology we need to understand refers to the amplitude of the oscillations from a sound source. We could call this the volume level, amplitude, intensity or loudness of a sound source. All these terms describe how much the air vibrates and how much the fluid in the cochlea moves. The information from the nerve endings sends impulses to our brain that determine how intensely we perceive the sound.
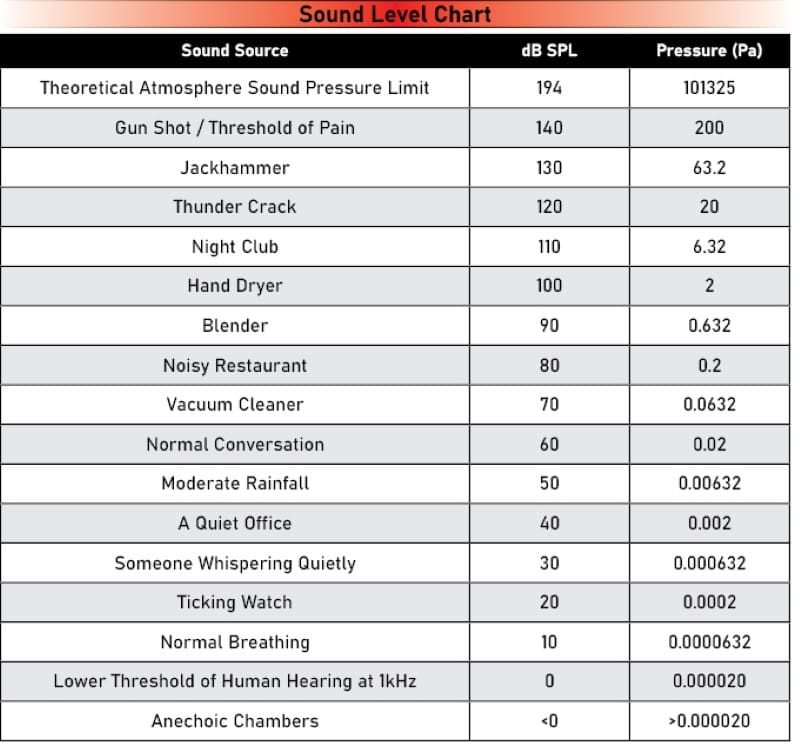
Sound levels are measured using the term decibel. Using this term in audio discussions can be confusing as it has different meanings in different contexts. Specifically related to sound pressure levels, the abbreviation dB SPL is often used. The scale is logarithmic to compress massive changes in pressure into numbers that are easy to comprehend.
Sound pressure levels have to be referenced to some standard. We use 20 micropascals (µPa) as the reference level of 0 dB SPL. This level isn’t absolute silence, however. Zero dB SPL is considered the lower threshold of human hearing and was initially referenced to the sound a flying mosquito produces at a distance of 3 meters (9.84 feet) from your ear. As such, it’s relatively easy to have a much quieter environment than 0 dB SPL. As of May 2024, Orfield Laboratories in Minnesota has an anechoic chamber with a background noise level of -24.9 dB SPL with an A-weighting. This took the record back from the Microsoft chamber in Redmond, Washington, which was -20.35 dB SPL. A sound level of -24.9 dB SPL equals 1.13 micropascals (µPa).
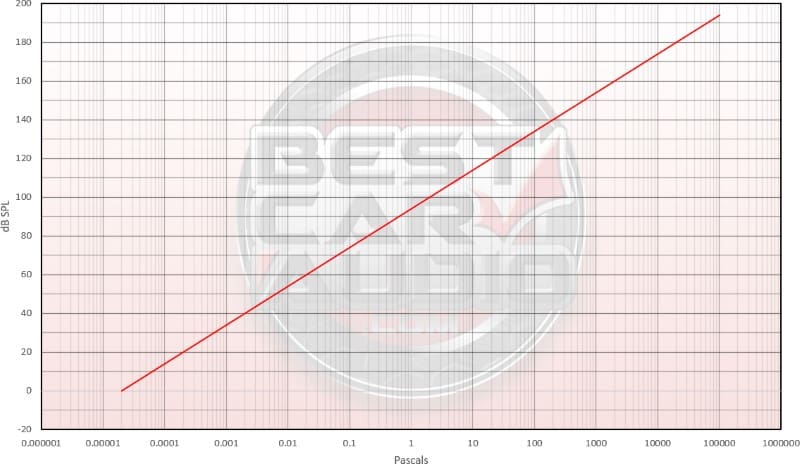
While we’re crunching numbers, let’s look at why we use the logarithmic decibel scale to represent these vast changes in pressure. The chart below shows pressure levels in pascals across the bottom X-axis and dB SPL along the vertical Y-axis. As you can see, the relationship is linear when the pressure scale is logarithmic. The highest theoretical SPL level of 194 dB represents 5.066 billion times more pressure than the 20 uPa represented by 0 dB SPL.
Understanding Loudness
There’s a lot of misunderstanding when comparing the relative loudness of various sounds. The confusion comes from the math involved in the doubling or halving of power to a speaker. We will leave that for a separate article.
A change in sound pressure level of 1 dB is only just perceivable by the human ear. The sound must be a pure tone, with very little background noise. A change in sound pressure level of 3 dB is usually perceivable by most people across most of the audible frequency range. The common practice of 10 dB being perceived as twice as loud is a widely accepted estimate rather than an absolute fact, as individual perception of loudness can vary.
For now, if you are thinking about 3 dB being twice the power, that’s all the amplifier and speaker stuff. As mentioned, we’ll save all that for later.

Audio Terminolog – Octave and Harmonics
Since we often discuss music when discussing audio systems, we should add a few music-specific pieces of audio terminology. First, we have the term octave. This refers to a note that is double or half the frequency of another note. For example, middle C on an 88-key piano is called C4. It has a fundamental frequency of 261.626 hertz. If we play a one-octave higher note at C5, the frequency is 523.251. If we move down an octave from middle C (C4) to play a C3 note, the frequency would be 130.813 hertz.
Another essential term to understand is harmonic. A harmonic is a whole number multiple of a starting frequency. In the example above, C5 is the second harmonic of C4. The first harmonic of C4 is C4, which is quite counterintuitive. Here is where octaves and harmonics differ. Another octave higher would be C6. The third harmonic of C4 is three times its fundamental frequency or 784.878 hertz. This is well below C6, with a fundamental frequency of 1,046.504 hertz.
To summarize, octaves represent a doubling or halving of a frequency. Harmonics are multiples of a frequency.
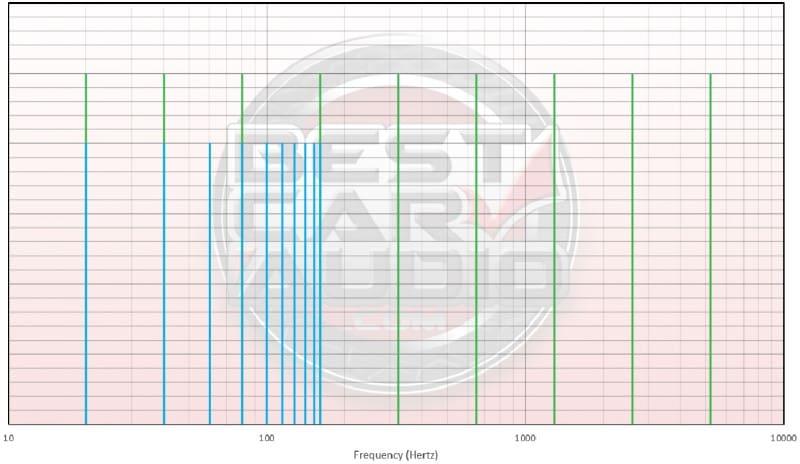
From the chart above, we have two fundamental frequencies at 20 Hz. I made the green octave lines taller so they would stand out from the blue harmonic lines. One octave above 20 Hz is 40 Hz. In this chart, another octave is 80 Hz, and they increase in multiples of two out to 5,120 Hz. The octaves don’t have to stop, but we had to cut the graph off somewhere.
The blue line on the far left is also at 20 Hz. The second harmonic of 20 Hz is 40 Hz. The third and fourth harmonics are at 60 and 80 Hz. We show up to the tenth harmonic at 200 Hz in this chart. More are possible, but they get very close together at higher frequencies.
Frequency Response
Another essential piece of audio terminology to understand when talking about audio systems is frequency response. A frequency response chart or graph shows the volume or amplitude of a sound source relative to a range of frequencies. This information is crucial for understanding what an audio system sounds like, how a speaker performs and how to change a subwoofer enclosure design.
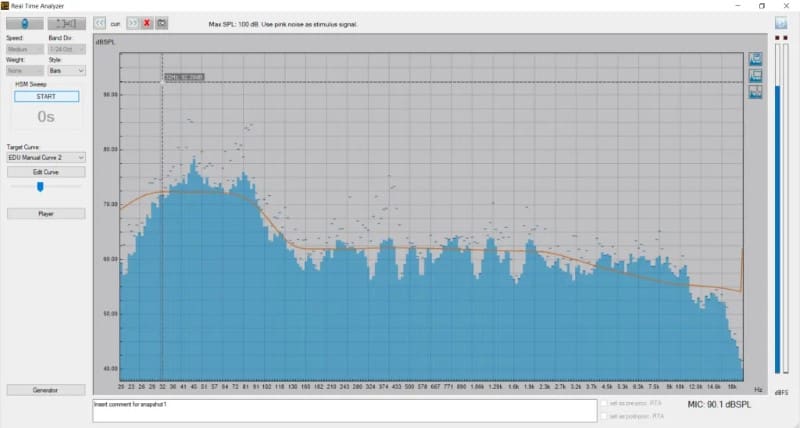
For example, if we look closely at the information provided in the above graph, we can see a spike in output of about 5 to 6 decibels around 45 hertz. We can also see that the high-frequency output above 11 kHz rolls off quite quickly. There are more observations, but these are just two highlights.
What’s important about a frequency response measurement is that the information presented is clearly defined in terms of amplitude. The vertical Y-axis of this graph is in dB SPL and the horizontal X-axis shows frequencies from 20 Hz to 20 kHz. We’ll dive deeper into understanding frequency response measurements in a future article.
Thanks to Audison for the frequency response image from the bit Tune calibraton solution.
Car Audio 101.1 – Audio Terminology
Wrapping up our exploration of foundational audio terminology sets the stage for delving deeper into the world of car audio systems. Understanding these basics is crucial for anyone looking to upgrade their car’s sound system, as it provides the vocabulary needed to navigate the complexities of audio performance and equipment. As we progress through this series, we’ll build on this knowledge, covering everything from component operation and selection to how technicians integrate products into your vehicle, configure that equipment, and calibrate signal processors. Stay tuned as we embark on this journey to achieve the ultimate in-car audio experience.
The next lesson deals with understanding the basics of electricity.
